How to Do Chemical Peels at Home Safely
You look in the mirror and see the same stubborn dark spots and dull texture. You’ve tried gentler products, but they only helped a little, so now you’re ready for something stronger.
Chemical peels promise real results because they can fade hyperpigmentation, smooth texture, and make your skin look years younger. What started as medical treatments has evolved into products you can use at home.
But here’s what you need to know upfront. In 2024, the FDA issued warnings about at-home chemical peels after documented cases of chemical burns, permanent scarring, and emergency room visits. Real people ended up with damaged skin because they didn’t follow proper protocols.
The good news is that when you understand the difference between safe at-home exfoliation and medical-grade peeling, you can do this successfully. At-home peels work on dead surface cells only and never touch the live skin underneath, and this guide shows you exactly how to maintain that safety boundary.
Quick Start Guide
New to chemical peels? Here’s what you need to know:
What Chemical Peels Actually Do
Chemical peels use acids to break down dead skin cells by dissolving the sticky lipids holding those cells together, so your outer layer sheds faster and fresh skin surfaces sooner while collagen production kicks into gear.
The payoff includes smoother texture, faded dark spots, softer fine lines, and brightness your daily products can’t deliver. The key is keeping your at-home treatments on the surface layer only and never penetrating to the live skin underneath.
Types of Chemical Peels: Superficial, Medium, and Deep
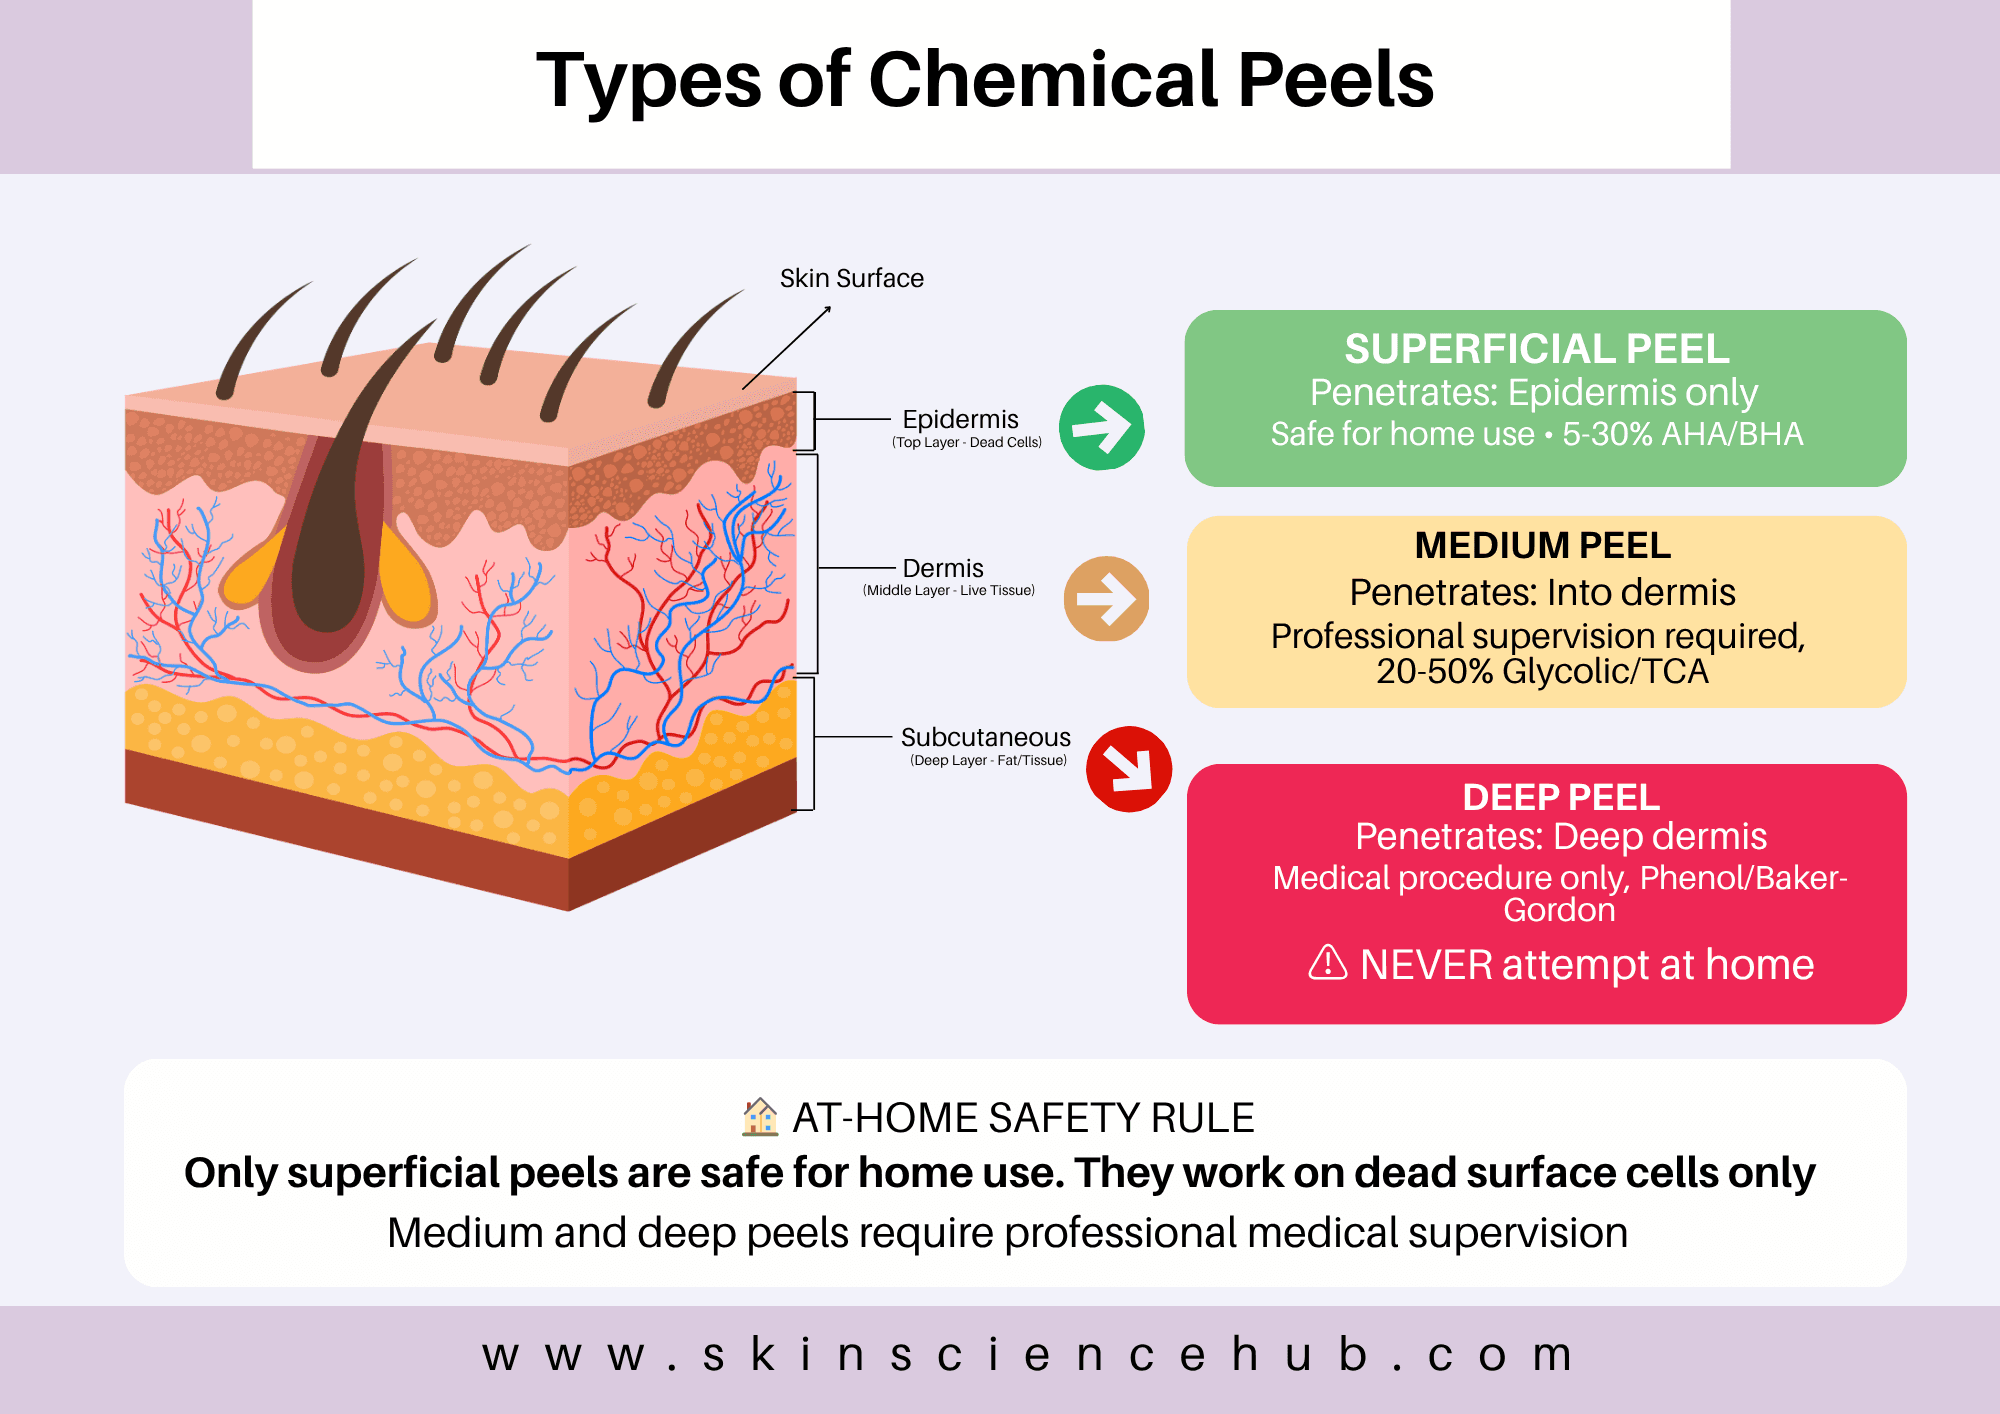
Not all chemical peels are created equal, and they differ by how deep they go based on concentration, pH, and acid type.
Superficial peels work on your top layer of skin (the epidermis) and improve mild acne, acne scarring, hyperpigmentation, fine lines, and sun damage. They use 5-30% AHAs or 2-20% BHAs with 1-3 days of downtime, and you’ll need treatments every 4 weeks for best results. When you use them correctly, they’re safe for all skin types, and this is your only at-home option.
Medium peels go deeper into your dermis and address moderate wrinkles, deeper acne scars, and sun spots by using 20-50% glycolic acid or 10-35% TCA with 7-10 days of visible peeling. If you have darker skin, there’s a higher risk of hyperpigmentation, so these require a professional and you shouldn’t attempt them at home.
Deep peels penetrate the deepest skin layers and treat severe wrinkles, deep scarring, and significant sun damage using phenol or Baker-Gordon formulas. These need heart monitoring because phenol can affect your cardiac function, and they can permanently lighten your skin. These are serious medical procedures done in surgical settings, so never, ever attempt these at home.
Chemical Peel Side Effects and Risks
Let’s be real about what can go wrong. Most people who follow the protocols correctly experience only mild, temporary redness and tingling, but when you skip safety steps, serious complications happen.
The FDA documented actual emergency room cases in 2024 involving chemical burns, permanent scarring, and other serious issues.
Here’s what you’re protecting yourself against:
Chemical burns happen when you leave peels on too long or use concentrations that are too strong for home use, which is why you’ll always set a timer and start with the lowest concentration.
Permanent scarring can result from burns or from picking at peeling skin, so you’ll resist the temptation to pull at loose skin and let it shed naturally.
Hyperpigmentation or hypopigmentation may be permanent if you don’t protect your skin from sun during recovery or if you use peels that are too strong, and your dark spots can actually get worse instead of better.
Infections occur when you apply peels to broken skin or pick at peeling skin with unclean hands, so you’ll only apply to intact, healthy skin.
Eye damage can happen if the solution contacts your eyes, which is why you’ll keep peels away from your eye area and have water ready to rinse immediately if accidental contact occurs.
When to seek immediate medical care: If you experience severe burning that doesn’t stop after rinsing, blistering anywhere on treated skin, white or grey patches, extreme swelling, signs of infection like fever or pus, or difficulty breathing, get emergency medical help right away and don’t wait to see if it improves.
These risks sound scary, but here’s the important part: they’re avoidable when you follow the protocols in this guide. Thousands of people safely do at-home peels every month by respecting the process.
At-Home vs Professional Chemical Peels: What’s the Difference?
| Factor | At-Home | Professional |
|---|---|---|
| Concentration | 5-30% acids | 30-70%+ acids |
| Downtime | 1-3 days | 3-21+ days |
| Results | Gradual over weeks | Dramatic in days |
At-home peels work slowly, and you’ll see real transformation after 3-6 peels over 2-3 months. Professional peels deliver faster, more dramatic results but come with longer recovery times and higher cost, and most people use both approaches: professional peels for intensive correction and at-home for maintenance.
You’re a good candidate for at-home peels if you have mild concerns like dullness, light hyperpigmentation, or fine lines, want gradual improvement, feel comfortable following detailed instructions, and can commit to a series of treatments over months.
You should see a professional if you have moderate to severe concerns, want faster results, have darker skin and worry about hyperpigmentation risk, or simply prefer expert guidance and supervision. There’s no shame in choosing professional care.
Who Should Avoid At-Home Chemical Peels
Before you go any further, let’s make sure you’re a good candidate for at-home peels. This is your safety checkpoint.
Active Skin Conditions
Skip peels if you currently have cold sores, eczema, psoriasis, rosacea, sunburn, or bacterial skin infections. Wait until these are completely healed before attempting any peel.
Pregnancy and Nursing
Don’t do peels if you’re pregnant or nursing. Wait until after you’ve finished nursing to begin peel treatments.
Medications
Avoid peels if you’re currently on Accutane or finished it within the last 6-12 months. Also skip them if you take medications that increase sun sensitivity (photosensitizing medications).
Medical Conditions
Don’t attempt peels if you have a history of raised scars (keloids), heart problems, very thin skin with visible tiny blood vessels, lupus, or severe seborrheic dermatitis. These conditions require medical clearance first.
Recent Hair Removal
Wait several hours after shaving your face before applying a peel. Freshly shaved skin has microscopic cuts that make it more vulnerable to irritation.
Darker Skin Tones
If you have darker skin (Fitzpatrick types 3-6), talk to a dermatologist first. You have a higher risk of post-inflammatory hyperpigmentation, and a professional can help you choose the safest approach.
Mental Readiness
Here’s something people don’t talk about enough: chemical peels are uncomfortable and your skin will look worse before it looks better. If you’re anxious, nervous, or easily distressed by temporary changes in your appearance, this might not be right for you regardless of your skin type. You need to be mentally prepared for both the discomfort and the way your skin will look during recovery. That’s not a character flaw, it’s self-awareness.
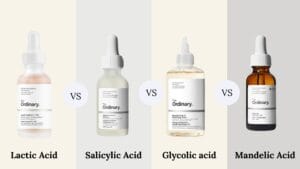
Best Acids for At-Home Chemical Peels
You have four safe acid options for home use: lactic, glycolic, salicylic, and mandelic. Each targets different concerns.
Lactic Acid
This is your gentlest option and the best choice for beginners or sensitive skin because it improves dull texture, mild pigmentation, and dryness while actually hydrating your skin as it exfoliates. You’ll find home-use strengths ranging from 5-30%.
Look for peel products like MUAC Lactic Acid Peel (available in multiple strengths – beginners should start with 30% or 40%), NeoStrata Gel Plus 15 AHA. Make sure the pH is between 3.5-4.0.
Choose lactic acid 30-40% if you’re trying peels for the first time, have dry or sensitive skin, or want the gentlest option. Start with 30 seconds contact time – short timing keeps it gentle and safe
Glycolic Acid
This gives you the most dramatic results for anti-aging, fine lines, sun damage, and stubborn pigmentation because it has the smallest molecule, so it penetrates deepest, which also makes it the most potentially irritating. Home-use strengths range from 5-30%.
Look for peel products like The Ordinary AHA 30% + BHA 2% Peeling Solution or Drunk Elephant T.L.C. Sukari Babyfacial, and check that the pH is between 3.0-3.5.
Choose glycolic acid 10-20% for anti-aging and stubborn pigmentation, but only after you have experience with gentler acids, and start at 10% so you can work your way up.
Salicylic Acid
This is oil-soluble, which means it can penetrate into your pores, and this makes it perfect for oily skin, acne, blackheads, and large pores. It’s also anti-inflammatory, which helps calm angry breakouts, and home-use strengths range from 2-20%.
Skip this one if you’re allergic to aspirin.
Look for peel products like MUAC Salicylic Acid Peel (15% or 20%) or Perfect Image Salicylic Acid 20% Gel Peel
Choose salicylic acid 10-15% if you have oily, acne-prone skin.
Mandelic Acid
It has the largest molecule and slowest penetration, which makes it ideal for sensitive skin and darker skin tones who face higher hyperpigmentation risk, and it also helps with mild acne.
Look for peel products like MUAC Mandelic Acid Peel (25% or 40%) or Platinum Skin Care Mandelic Acid 20% Chemical Peel
Choose mandelic acid if you have darker skin tone, very sensitive skin, or want a gentler alternative to glycolic or lactic acid.
Why pH Matters
Concentration isn’t everything because a 30% AHA at pH 2.0 hits way harder than 30% at pH 3.5 (lower pH means more acidic and deeper penetration). Look for products with pH between 3.0-4.0 for safe home use.
Acids to Avoid at Home
TCA (Trichloroacetic Acid) is unpredictable and harder to apply evenly than AHAs or BHAs, so even though some companies sell low-percentage TCA for home use, this is one acid best left to professionals.
Jessner’s Peel combines multiple acids and goes deeper than you want for home use. When in doubt, stick with glycolic or lactic acid instead.
How Often to Do At-Home Chemical Peels
Start with one peel every 4 weeks, and after you’ve done 2-3 monthly treatments and understand how your skin responds, you can increase frequency to every 2 weeks if your skin tolerates it well.
Some experienced users with high tolerance go weekly, but most people don’t need this level of frequency.
Before each treatment, honestly assess whether you experienced any irritation from the previous one, and if you did, don’t increase strength or frequency. Stay at the same level or dial it back until your skin is completely calm, and never do another peel if your skin is still recovering from the last one.
Fall and winter are your best times for starting a peel series because you can easily avoid direct sun exposure, while summer sun makes post-peel hyperpigmentation much more likely, so save your intensive treatments for cooler months.
Watch for signs of over-exfoliation: redness that doesn’t go away, increased sensitivity to everything, constant peeling that never seems to stop, more breakouts than usual, shiny tight appearance, or chronic dryness.
If you see these signs, stop all peels for 4-6 weeks and let your skin fully recover.
How to Prepare for a Chemical Peel
The Critical Two-Week Rule
Before you attempt any chemical peel stronger than 10%, you need to prep your skin with a gentle version of that acid type for at least 2 weeks, and this step is non-negotiable.
If you’re planning an AHA peel (glycolic or lactic), use an 8-10% AHA toner or serum. If you’re planning a BHA peel (salicylic), use a 2% BHA toner or serum. Start by applying 2-3 times per week during the first week, then increase frequency as your skin tolerates it well. Some people build up to daily use by week two, while others stay at every other day.
This prep period acclimates your skin to acids and dramatically reduces your risk of discomfort, redness, and irritation during stronger treatments, and it’s one of the biggest mistakes beginners make when they skip it.
Two Weeks Before Your Peel
Stop all retinoids, and for superficial peels, stop Retin-A or tretinoin 2-3 weeks before. If you have sensitive skin or plan to use stronger concentrations, you may need to stop retinoids for up to 3 months before your peel, and if you’ve been on Accutane, you need to wait 6-12 months minimum after finishing.
Stop vitamin C serums and all other acids except your prep acid (the 8-10% AHA or 2% BHA you’ve been using to acclimate your skin). Continue using your prep acid daily during this two-week period, but stop it 2-3 days before your actual peel. Your skin should not be freshly exfoliated when you apply the stronger peel.
Avoid sun exposure and use SPF 30+ every single day, and skip waxing or facial hair removal on your face during this time.
Patch Test 48-96 Hours Before
Apply the peel product to your inner arm exactly as you plan to use it on your face, then check it at 24, 48, and 96 hours.
Any redness, burning, or itching means don’t use it on your face, and it’s better to find out on your arm than your face.
How to Apply an At-Home Chemical Peel
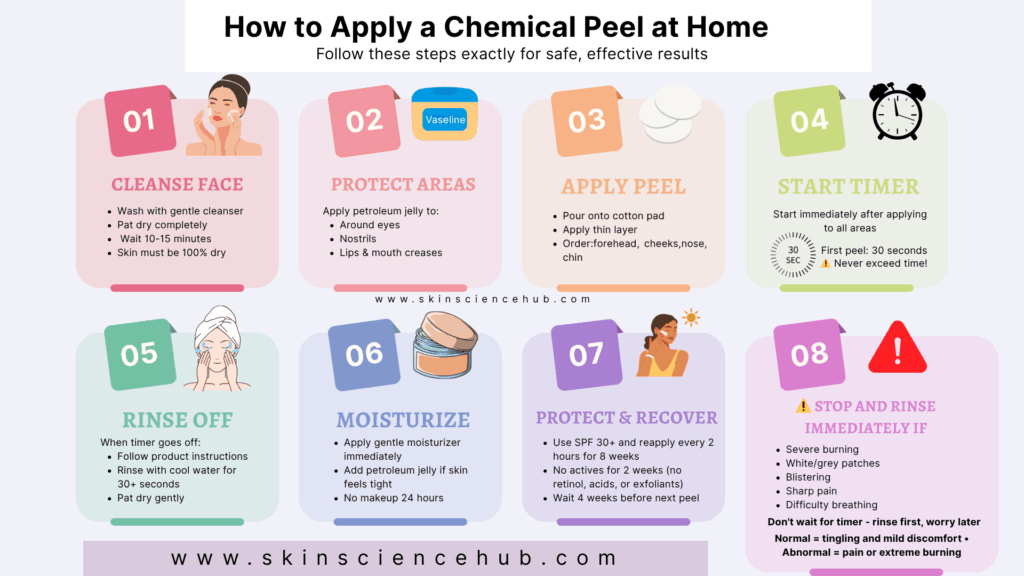
Important heads up: On the day of your peel, skip all exfoliation including scrubs, brushes, or other exfoliants in the 2 days before your peel treatment, and avoid anything that stimulates, heats, or irritates your skin. The peel itself is your exfoliation for the day.
Before you start: Read your product instructions all the way through and figure out whether your peel is self-neutralizing (you just rinse it off) or requires a neutralizer solution.
Get everything ready including your timer, cotton pads, petroleum jelly, and neutralizer if you need it, because you don’t want to be searching for supplies with acid on your face.
Wash your face with a gentle cleanser, then wait 10-15 minutes until it’s completely dry. Pull your hair back and out of the way, and apply petroleum jelly around your eyes, nostrils, lips, and the creases from your nose to your mouth to protect these sensitive areas from the peel.
Pour a small amount of peel onto a cotton pad and apply a thin layer in this order: forehead, cheeks, nose, chin. Stay away from your eye area and lips, and start your timer the second you finish applying to all areas.
Contact time progression (remember, each treatment is spaced 4 weeks apart):
- Your 1st treatment: 30 seconds
- Your 2nd treatment (4 weeks later): 1 minute
- Your 3rd treatment (4 weeks later): 1.5 minutes
- Your 4th treatment (4 weeks later): 2 minutes
- Keep increasing by 30 seconds with each monthly treatment
- Maximum: 5 minutes for most at-home peels
You’ll feel tingling during application, and that’s normal and expected.
STOP AND RINSE IMMEDIATELY if you experience: severe burning, white or grey patches appearing on your skin, blistering, sharp pain, or difficulty breathing. Don’t wait for your timer because you should rinse first and worry later.
When your timer goes off: Follow your specific product’s instructions. Self-neutralizing peels just need rinsing with cool water for at least 30 seconds, while peels that need a neutralizer require you to apply that neutralizer solution first, then rinse with cool water.
Pat your face dry gently rather than rubbing.
Apply a gentle moisturizer right away, and add petroleum jelly if your skin feels tight. No makeup for 24 hours and no active ingredients for two full weeks.
Quick note: These instructions are for facial peels, and if you want to use peels on your body, you need to be extra cautious since body skin has different sensitivities than facial skin.
Why You Must Follow Timing Exactly: Here’s the thing about contact time: it directly controls treatment strength and depth, so a 20% peel left on for 5 minutes can actually be stronger than a 30% peel left on for 1 minute. That’s why the timing progression matters so much, and you should never think “I’ll just leave this on longer to make up for the lower concentration” because that’s not how it works. Stick to the protocol.
Chemical Peel Aftercare
Your skin is vulnerable after a peel, so what you do next determines both your results and your safety.
First 24-48 Hours
Apply gentle moisturizer 3-4 times daily and use SPF 30+ with reapplication every 2 hours. Stay indoors if you can manage it for the first 48 hours, and skip makeup during this period.
Avoid sweaty workouts, hot water, and direct sun exposure while letting any peeling happen naturally, and don’t pick at your skin no matter how tempting it is.
During Active Peeling (Days 3-7)
Don’t wash your face with cleanser while you’re actively peeling, though you can splash cool water and apply moisturizer as your product directs.
Skip cleansers during this phase to protect the delicate new skin forming underneath, and once peeling finishes (usually around day 7), you can go back to gentle cleansing.
What to Avoid for Two Weeks
Stop all exfoliating products for at least 2 weeks after peeling, which means no granular scrubs, no glycolic acid, no benzoyl peroxide, no sulfur, no resorcinol, no Retin-A, no salicylic acid, and no lactic acid. Nothing that exfoliates because your skin needs this recovery time.
What to Avoid for One Week
Stay away from anything that heats up your skin including saunas, hot yoga, hot baths, and prolonged hot showers, because heat stimulates melanin production and can trigger hyperpigmentation even when you’re wearing sunscreen. Keep your environment cool.
Sun Protection for Eight Weeks
This is crucial, so avoid direct sun exposure for a full 8 weeks after peeling and use broad-spectrum SPF 30+ at all times while reapplying every 2 hours.
If you’re treating hyperpigmentation, be extra careful during these 8 weeks because your skin is more vulnerable to UV damage than you realize, even weeks after your peel.
Watch for Warning Signs
Normal reactions include redness, tightness, and peeling. Concerning reactions include severe itching beyond mild discomfort, swelling beyond normal pinkness, severe redness that gets worse instead of better, and persistent stinging.
These rare allergic reactions need immediate professional attention.
If dark spots develop, they usually fade within a few weeks with strict sun protection, but if they persist after 2-3 weeks, you might need a mild bleaching cream from your dermatologist.
Call your dermatologist right away if you see signs of infection including spreading redness, increasing pain, fever, or pus.
Chemical Peel Results: Timeline and Recovery

Chemical peels improve skin texture, even tone, lighten hyperpigmentation, and soften fine lines, but they won’t erase deep wrinkles, eliminate scarring or deep acne pocks, repair severe sun damage, or lift sagging skin.
Day 1: Your skin will be red and flushed right after application, and you felt tingling or mild burning during the peel, which was normal. You won’t see much visible change during the first 24 hours.
Days 2-3: Your skin starts looking tan or dark, sometimes splotchy, and this is expected and doesn’t mean something went wrong. It’ll feel tight and dry, and peeling usually begins around your mouth and chin first. This is often when you look your worst, and that’s totally normal.
Days 3-7: The peeling progresses across your face in a predictable order: mouth and chin first, then cheeks, then around your eyes, while your neck and forehead peel last. Don’t pull at loose skin because pulling causes infection and hyperpigmentation, so let it shed naturally.
Light at-home peels might only cause mild flaking or no visible peeling at all, which doesn’t mean your peel didn’t work.
Weeks 2-4: This is when you start seeing the good stuff including smoother texture, brighter tone, dark spots fading, pores looking smaller, and fine lines softening.
After 3-6 treatments: Now you’ll see significant improvement, and you can expect 40-60% reduction in hyperpigmentation and 30-50% improvement in fine lines. Your skin will feel noticeably smoother and look more radiant, and getting here takes 2-3 months of consistent treatments, so patience is key.
If You’re Using Peels for Acne
If you’re treating acne-prone skin, you might break out more during your first few treatments as the peel uncovers hidden clogs. This is temporary purging, not your skin getting worse, and most people see real improvement after 3-4 peels.
How Long Do Results Last?
Results last several weeks to 2-3 months per treatment, and most people do maintenance peels every 4-6 weeks to sustain their improvements. Without maintenance, your skin gradually returns to its previous state.
Bottom Line
Chemical peels work beautifully when you respect the process. Start with lactic acid 30% or mandelic acid 20-25%, prep your skin with acid toners for 2 weeks first, follow every safety protocol exactly, and be patient through 2-3 months of consistent treatments. When in doubt about your skin type or any step in this process, talk to a dermatologist. Getting professional guidance means you’re smart enough to know when to ask for help.